THE

KETTLEBELL EXERCISE LIBRARY

FUNDAMENTAL SKILLS

Kettlebell exercise workouts are a potent tool in delivering exceptional weight loss, shape and muscular strength and tone. But as with most things you have to know the basics.

Below is the Kettlebell Exercise Library with accompanying drills.

These are the essential and fundamental skills that have to be mastered. In order for you to progress, achieve results and avoid injuries. before attempting any kettlebell fitness workout regime.

They are listed in chronological order, so that each exercise acts as a stepping stone from one skill to another. Performed individually, or in combinations.

Before attempting any of these exercises, it is imperative that you have  read the Kettlebell Lifting and Exercise Guidelines. And thoroughly completed Preparation 2, Preparation 3 and Kettlebell Activation drills.

THE 8 ESSENTIAL KETTLEBELL EXERCISES

KETTLEBELL DEADLIFT

It is important to get into the habit of safely lifting the kettlebell from the floor. And the Kettlebell DeadLift is a vital pre requisite kettlebell exercise to demonstrate safe technique.

  1. First of all place the kettlebell directly under and between your feet.
  2. Hold the handle with your fingers while keeping your head up, chest out and back straight.
  3. Your feet should be slightly wider than shoulder width in the squat position.
  4. With your arms straight and loose, tense the abdominal muscles as if about to be hit, and take a deep breath in.
  5. Exhale, and simultaneously lift the kettle bell while locking out your legs and tensing your glute muscles.
  6. Finish in a straight standing position.


NOTE :

This technique must be adhered to at all times, even if the weight is light. Taking kettlebells, or any other training equipment for granted can lead to injuries !

FRONT SQUAT

Many people associate the Front Squat Kettlebell Exercise as just a leg workout. But physiologically it offers so much more.

For a start, it helps develop very strong multiple intrinsic muscles of the core, back and oblique muscles. These muscles help stabilise the spine, and help build flexibility and mobility in the hips and calves to increase posture.

One of its biggest advocates was a  leading pioneer of the body building world called Mike Mentzer.

Mentzer would lift extremely heavy weights in the Front Squat (barbell) without a lifting belt. Forcing him to over engage the core muscles to keep the spine in a neutral position.

It is said that he never performed any kind of crunches to produce his six pack, as the Front Squat produced the ultimate core activation !

  1. Position your feet slightly wider than shoulder width.
  2. Grip the kettlebell at the base of the handles, so the top of the handle is at eye level.
  3. Hold it in the middle of your chest, with your elbows tucked into the sides of your ribcage.
  4. Take a deep breath in through your nose to your stomach, while engaging the core.
  5. Proceed to push your backside back the moment you bend your knees. Your knees shoud follow a line behind your toes, and your spine in a neutral position as you descend.
  6. Breath out through your teeth slowly to increase the intra abdominal pressure as you lower.
  7. As you begin to reach the bottom, exhale completely and sink down as far as you can comfortably.
  8. Once fully at the bottom, keep the core engaged and with neutral spine.
  9. Inhale through the nose again and tense the Glute muscles.
  10. Breathing out forcefully through your teeth as you ascend back to the start position.
  11. Repeat the process.


NOTE : 

The GOBLET SQUAT and complimenting HIP MOBILITY DRILLS are excellent conditioning for the Front Squat.

THE KETTLEBELL SWING

MINI SWING

The Mini Swing is a great introductory kettlebell exercise.

It allows you to experience swinging the kettlebell by initiating good hip utilisation from the start. Use this in your warm up, to fire up the hips and glutes.

If you have’nt already done so, please watch the Hinge at Hip and Shallow Knee Bend Drills that concentrate on correct posture and breathing.

  1. Hold the kettlebell arms straight and bend your legs slightly to push your hips back.
  2. Press the kettlebell into the hips / groin  as if loading a catapult.
  3. From there, tense the glutes and lock out the knees simultaneously so that the hips thrust the kettlebell forward.
  4. Keeping your arms straight and loose all the time.
  5. Let the kettlebell swing no more than waist height,  just using the hips.
  6. Allow the kettlebell to swing back to the hips, and repeat the sequence.


Note : 

It is important that the kettlebell returns to the hip and groin after the swing. Concentrating on contracting the glute muscles for a more powerful hip snap.

The hip is your power base.

Perform this drill in a continuous and smooth rhythm.

FULL SWING

The full kettlebell swing is more or less an exaggerated version of the mini swing, but with a bigger range of motion (ROM). It acts as the essential prerequisite foundation for every other kettlebell exercise that is incorporated into kettlebell training.

On mastering the swing you develop incredible power in the hips.

This is vital when executing combinations and exercises with heavier weights, and teaches you how to economise your efforts when in the full throws of an intense workout. Especially if your session is endurance based.

In addition to being one of the best body toning exercises and developing muscular strength. This exercise produces power generation and shock absorption.

  1. Perform a Mini Swing to snap the kettle bell forward using the hips.
  2. Let the kettlebell return to the hip and groin area without fully bending the knees.
  3. Allow the kettle bell to swing further behind by adopting a greater ROM Hinge at the Hip  keeping your head neutral, back straight and pushing your backside back.
  4. Contract the glutes hard again while locking out the legs to propel the hips forward.
  5. Pull with the arms but without actually using the arms to excellerate the kettle bell to shoulder height.
  6. Lean back without arching back so heels are pushing through ground.
  7. Let the kettlebell travel outwards horizontally to help counter act any forward momentum of the body.
  8. Engage the core & abdominals at all times to protect the back, and do not resist the weight with the arms.
  9. Allow the large muscle groups like the glutes and hamstrings to act as shock absorbers, and control the kettle bell as it descends.


NOTE :

Returning the kettlebell to the HIP/GROIN with straight arms, acts as an extention to the hip thrust on the upward phase of the swing.

A similar scenario or analogy would be a carriage attatched to a train pulling the other carriages.

Where the :

TRAIN                            =   POWER (HIPS)                                                    

CARRIAGE                    =   LINK (STRAIGHT ARMS)             

OTHER CARRIAGES    =   KETTLEBELL   

SINGLE ARM SWING

As with kettlebell swings, the same rules apply with regards to the action. The only real differences are the hand grip positions and the extended range of motion (ROM) by using just one hand.

Hand Grip Position on Single Arm Swing

  • When initiating a single arm swing, have the kettlebell rest upon the top of the thigh and gently push it forward to develop momentum.
  • On the downward phase, the holding hand palm should be facing outwards (eg: Right hand hold, right hand palm facing right).
  • Allow the kettlebell to return to hip and groin area while hinging at hip, and on pull through, corkscrew the holding hand through ½  a turn so the palm is now facing down when at shoulder level.
  • Repeat the process.

HAND TO HAND SWINGS

The Hand to Hand Swing (H2H kettlebell) involves the transfer of the kettlebell from one hand to the other.

The mechanics are the same as the Single Arm Kettlebell Exercise. Only this time your overall grip needs to be more inside the rim of the kettlebell handle. To allow a smooth transition from one hand to the other.

NOTE :

You only change hands at shoulder height level. And always have the opposite hand outstretched in front, ready to catch the kettlebell.

THE KETTLEBELL CLEAN

As well as being an imperative kettlebell exercise. It also acts as a hub in the transition to other drills. And is excellent in helping develop the tension / relaxation phase, focusing on powerful hip snap.

RACK POSITION

The Rack Position acts as a transitional hub between the lower and upper body after the Kettlebell Clean.

It is also a good starting point to familarise yourself with where the kettlebell needs to finish upon execution of the Clean. And to gauge what weight kettlebell might be best for you.

  • The kettlebell should be placed between the forearm held at 90° and Biceps with the elbow tucked into the ribcage.
  • The palm or inside of the hand pointing inwards, and just outside centre of the chest.
  • The top of the wrist must be flush with your forear
  • Spend  30 seconds – 60 seconds  on each arm, walking up and down.

BACK TO FRONT CLEAN

The Back to Front Clean (below) is a great kettlebell exercise and drill to do before attempting the clean itself. And to get a feel for decelerating the kettlebell from the Rack Position.

This encourages activation of all the major large muscle groups involved.

  1. Pick up the kettle bell with both hands and position it on either the left or right side in the Rack Position.
  2. Position the feet a little wider than shoulder width and Inhale deeply.
  3. Engage core
  4. Simultaneously let the fist drop while raising the elbow that will allow the kettle bell to flip over and descend to the floor.
  5. At the same time bend your knees, and push your hips back, keeping chest out and head up.
  6. Exale and let the holding arm go loose, concentrating on absorbing the weight of the kettle bell with the big muscle groups the glutes and hamstrings.
  7. 10 reps each arm.

LOOSE ARM DRILL

The purpose of this kettlebell exercise drill, is to encourage you to relax the lifting arm when executing the clean manoeuvre.

This is a very hip orientated movement, which eliminates the excessive use of the arms  especially when lifting much heavier kettlebells.

  1. Position yourself directly over the kettlebell in a squat, with one hand gripping the top of the handle by the fingertips
  2. From there, dynamically squeeze glutes, draw thighs and engage core to drive legs upwards while keeping the arm straight.
  3. As legs reach maximum extention, briefly bend arm to assist in the ascendency of kettlebell.
  4. Quickly let go and relax the arm and hand before regripping,
  5. Allow the kettlebell to fall back to the ground decelerating by bending the knees and activating the core, glute and hamstring muscles.
  6. The eccentric or downward phase of the movement, creates a concentric phase or natural spring.
  7. Keep use of arms to a mimimum as this is a lower body drill.


NOTE :

You can catch the kettlebell with one arm each side, or alternate between both arms.

FULL CLEAN

The Full Clean is performed by combining the two previous kettlebell exercise drills of  Back to Front Clean and Loose Arm Drive Drill above.

  1. Place the kettlebell between your feet a little wider than shoulder width.
  2. Crouch down into a squat position keeping good posture and grasp hold of the handle with the holding hand arm straight.
  3. Grip the handle with fingertips.
  4. Gently tug at the weight without lifting the kettle bell so to eliminate any jolting.
  5. Take a deep intake of breath into your stomach while tensing the abs.
  6. Still keeping the lifting arm straight, drive through the feet and proceed to tense the glutes while locking and straightening the legs.
  7. Pull the kettlebell with the arm just as the legs lock out, and make sure it is kept close to the body.
  8. On full extension of the legs through engaging the thighs and glutes, simultaneously roll the kettle bell round your forearm and quickly tuck the elbow into your ribcage.
  9. Your elbow should now be resting on the bony part of your hips.
  10. The kettlebell gently resting on the outside resting of your forearm and shoulder.
  11. Your wrist flush with your forearm and at 90°, with the palm of the fist facing inwards.
  12. 5 – 10 reps on each arm

KETTLEBELL MILITARY PRESS

Apart from developing strength, the Military Pressadds the element of teaching you to tighten other parts of the body to control the weight.

For instance, a high percentage of athletes when lifting a weight above their heads, will solely rely on the deltoid muscles on the upward and downward phase. This not only prematurely fatigues the deltoids but can also create potential shoulder injuries.

A proper military press forces you to activate more or less the whole body. Utilizing additional key muscle groups such as the lattisimus dorsi, triceps, biceps, core and glutes.

Therefore the whole body becomes one solid foundation and makes lifting and lowering of the kettlebell far more productive.

VISUALIZATION DRILL

Before moving onto the FULL MILITARY PRESS low. Perform the VISUALISATION PRESS DRILL To help you adapt to the mechanics and discipline needed for future heavier weights.

This is an excellent kettlebell exercise drill to practice before embarking on the full Millitary Press. As it helps you concentrate on fully optimising the body as a whole, while focussing on effective breathing.

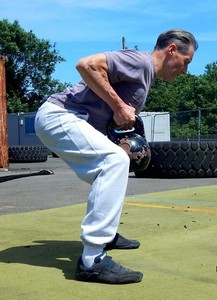
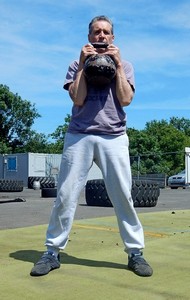
  1. Hold a light weight and start in the rack position.
  2. Breath in through your nose to your stomach.
  3. Visualize that the light weight you are holding is at least 5 times heavier than what it is.
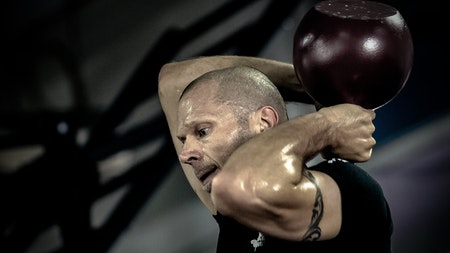
  4. Begin to raise and take the kettlebell out to the side.
  5. Breath out through your teeth intermittently and forcefully, increasing the intra abdominal pressure (similar to a pressure cooker) of the Transverse Abdominal Muscle.
  6. At the same time actively engage and tense the whole body. Especially on the same side you are lifting the kettlebell with.
  7. At the top of the movement and with the arm extended, exhale fully.
  8. Inhale again, andrepeat the same breathing pattern on the way down.
  9. Very slowly control the weight as it decends back to the Rack Position.
  10. Repeat  1-5 Reps on each arm


NOTE :

By performing with a light weight, this drill enforces the three essential elements of the discipline.

Namely : technique, muscle activation and breathing.

And does not compromise proper technique, through the preoccupation of trying to lift a weight that is to heavy.

Instead, it switches all of your focus and attention in concentrating on all the above components in lifting it. Therefore eliminating any flawed lifting patterns and reducing the possibility of injury.

This drill can dramatically increase strength gains, and is a fantastic exercise to use if injured.

FULL MILITARY PRESS

  • Position the Kettlebell in the Rack Position, your feet should be about shoulder width apart.
  • Inhale deeply and mentally focus on tensing the whole body, especially the lats, biceps, abs and glutes.
  • Exhale slowly through teeth, and simultaneously begin to press the kettle bell out to the side and up
  • Keeping the forearm at 90° all the way.
  • Lean slightly, and visualize pushing the kettle bell away from you, as opposed to trying to blatantly press it up.
  • Once extended, keep the KB close to your head touching your ear.
  • Allow the kettlebell to fall back, with arm extended, pushing your chest out and forward to help counterbalance.
  • Your arm totally locked out with palm facing forward.
  • Exhale forcefully.
  • To descend the kettle bell, inhale deeply into your stomach and actively tense your lat, glute and core muscles for total control in preparation to lower the kettlebell back to the rack position.
  • Breath out forcefully through your teeth just like a pressure cooker scenario creating a hissing sound to sustain the intra abdominal pressure of the core.
  • Simultaneously turn the palm in, while still in the extended position.
  • Still keeping the forearm at 90° gradually lower the kettlebell towards waist height while exhaling very slowly, sharply and forcefully.
  • Control the kettlebell back to the rack position by tucking the elbow into the side of the ribcage while slightly bending the knees and ballistically absorbing the weight with the outside of the shoulder.

THE KETTLEBELL SNATCH

No other kettlebell exercise demonstrates the absolute use of the hips, like Kettlebell Snatches.

In fact the Snatch is the most technically demanding discipline in the complete Kettlebell Exercise Library. And demands that you string every element together flawlessly.

SINGLE ARM HIGH SWING

Apart from being a great stand alone kettlebell exercise itself, the Single Arm High Swing is also an excellent preparation drill in controlling the decending mass of The Snatch.

  • Perform the SAHS the same way you would a single arm kettlebell swing, but above head height.
  • On the downward phase focus on more flexion at the hip, and it goes without saying, core activation.
  • As the kettlebell ascends, extend the arm outwards as you lean backwards (without arching the back) and tense your lat muscles while retracting your shoulder blade.


NOTE :

By leaning back and extending the arm, you shorten the return arc of the kettlebell which reduces the leverage.

Therefore you can perform this kettlebell exercise, with a heavy weight for longer without developing blisters.

HORIZONTAL PUNCH / SNATCH DRILL

One aspect of the Snatch which can be difficult to master, is the final phase of the upward swing into press.

If this movement is badly timed, you will repeatedly keep banging your wrist / forearm with the kettlebell, and also over rotate so the kettlebell pulls you backwards.

This kettlebell exercise performed as a drill, with a small or lightweight kettlebell. Is an ideal way to practice timing issues that will help the transition into a full snatch smoothly.

  1. Lightly  holding the kettlebell with either right or left arm, perform a Mini Swing but with a very slight kink in kettlebell holding arm. 
  2. As the bell swings through, execute a short sharp punch under control, so that the kettlebell flips over and gently kisses the top of your wrist.
  3. Quickly retract the arm back into the bent arm position again, before swinging back down.
  4. Repeat the for about  2 x 10 reps on each arm


NOTE :

The aim of the drill is to relax the hand so that you can control the tension needed to instantly recoil the moment the kettlebell touches the wrist.

Trying to develop the timing with a light weight, can sometimes be more challenging than using a heavy one. But once you get the hang of it move up to a slightly heavier kettlebell.

FULL SNATCH / RETURN TO RACK POSITION

The first Full Snatch Kettlebell exercise requires you to return the kettlebell to the Rack Position.

This is a great exercise to learn first. In order to get used to decelerating and absorbing its mass and ballistic shock. And by actively focussing on all the major muscle groups involved ie: Lats, TVA, Glutes, Hamstrings, Intrinsic Core Muscles

It is also a little easier on the hands.

IMPORTANT NOTE :

As with all or any of the above Kettlebell Exercises. Mentally focus on engaging your hip and core muscles at all times.

Ascending

  1. Begin by gently resting the kettlebell on either the right or left thigh and push it forward to generate sufficient momentum.
  2. Allow the kettlebell to swing back to the hip / groin area and push your hips back simultaneously.
  3. Keep the holding arm straight, and forcefully engage your glute muscles while locking out the legs to activate the hips.
  4. Still keeping the holding arm straight and in unison with the hips, pull the kettlebell through to swing upwards.
  5. Allow the arm to bend slightly as the kettlebell rotates externally and outwards around the forearm,
  6. Just before the arm reaches 90° perform a short sharp punch (Horizontal Punch Drill) to defuse the momentum.
  7. Allow the kettlebell to fall back under control at the same time leaning forward.
  8. Your biceps should be touching your ear, and your palm should be facing forwards


Descending Phase

  1. From the extended arm position. turn your palm inwards so the kettlebell is now on the outside of your forearm.
  2. Lean back while engaging your glutes, lats and core while extending your hips forward.
  3. Under control drop the kettlebell to the rack position.
  4. From the rack position, shove the kettlebell forward with your shoulder while relaxing the arm.
  5. Lean backwards to counter balance the the forward momentum of the kettlebell which is now swinging back to your hips to repeat the sequence.

FULL KETTLEBELL SNATCH / SWING RETURN

  1. Execute the snatch, as in previous return to Rack Position vid above.
  2. From the completed Snatch press position, breath in through the nose to the stomach and engage the glutes, core and lat muscles.
  3. Breath out through the teeth
  4. Keep the holding arm straight and gradually rotate the holding arm and kettlebell outwards around the forearm. So that it begins to nestles on the outside.
  5. Lean backwards (without arching the back) while retracting the shoulders and further tensing the Lats.
  6. With the holding arm still straight, allow it to gradually descend .Keeping the arc of its path downwards close to your centre of gravity and base of support.
  7. There should be a smooth movement from top to bottom, without any jolting. As the kettlebell swings back towards the hips
  8. Rotate the holding hand outwards and push the hips / glutes backwards to repeat the movement.

FULL KETTLEBELL SNATCH / DEAD POSITION

Lorem ipsum dolor sit amet, consectetur adipiscing elit. Ut elit tellus, luctus nec ullamcorper mattis, pulvinar dapibus leo.

Lorem ipsum dolor sit amet, consectetur adipiscing elit. Ut elit tellus, luctus nec ullamcorper mattis, pulvinar dapibus leo.

KETTLEBELL TURKISH GETUP

For a total body workout, and particularly for shoulder stability, the Turkish Get Up is king !

It activates and strengthens nearly every major muscle group including all important stabilizers, together with developing incredible strong ligament and tendons.

Kettlebell exercise routines are all about compactness and condensing the movement pattern. The TGU exhibits all of these characteristics simultaneously.

IMPORTANT NOTE :

Before attempting this exercise, it is advisable to learn the basic movement pattern below without a weight. Or by using a very light weight. Possibly with a dumbell.

FRONT VIEW
BACK VIEW

There are quite a few ways of performing the TGU, but we’ll demonstrate with the conventional method.

Ascending Phase

  1. Adopt a foetal position lying on your right side, with the kettlebell lying next to your head (the nearer the better).
  2. Grab the handle with both hands with the left hand grasping the top of the right.
  3. From this position, use the rotation of the body going to the left to drive the kettlebell up, and use both hands to press. You should now be in the Supine (on your back) position, with your right arm extended holding the kettlebell.
  4. Your left arm should now be at your left side on the floor to act as a support, there should be a 90° angle between each limb.
  5. Bend your right leg and stamp your right foot into the floor for extra stability, your knee should form a triangular shape.
  6. Your right arm must be kept totally straight 90° and the shoulder pulled into the socket at all times.
  7. Keep your eyes on the kettlebell throughout the whole duration of the exercise. As loss of concentration will allow the kettlebell to travel forwards or sideways culminating in loss of control and the risk of injury.
  8. While keeping the supporting left arm grounded, rotate forcefully to your left and simultaneously punch the straight holding arm up further vertically.
  9. Your head should now be facing to the left, with the kettlebell directly above it.
  10. Press your left elbow hard into the floor, and at the same time further punch the kettlebell upwards, so that your left forearm can roll into the position of main support.
  11. Extend your left arm fully from the forearm position, and proceed to squeeze the glute muscles hard to push your hips upwards.
  12. Your backside should be off the floor with the right leg bent and the left leg straight.
  13. From there, draw the left leg knee towards your supporting left hand, looking at the kettlebell and engaging the core tightly.
  14. Rotate to the right upwards, so that you are now in a lunge position.
  15. Compose yourself briefly, making sure that the kettlebell is falling back, and that the holding right arm biceps is touching your ear.
  16. Engage the core aggressively, push your chest out and tense your right glutes.
  17. Drive up into a standing position.
  18. Allow the kettlebell to work for you, by letting it fall further back to help you sustain a neutral spine (straight back) especially if you have a natural lean forward (kyphotic).
  19. Use the opposite supporting knee by pressing it down into the ground for additional help in pushing up.


Descending Phase

  1. From a standing position with the kettlebell held above your head, continue to check the holding arm is touching your ear, and that the kettlebell is pulling backwards.
  2. Reinforce core activation.
  3. With the left leg, take a step back into a kneeling / lunge position.
  4. From there reach back for the floor with your left hand. (Do not forget to keep looking at the kettlebell).
  5. The left knee will now slide forward to allow the hips to fall, so you are now seated on the floor.
  6. Your left arm extended acting as support, and your right arm extended holding the kettlebell.
  7. While still straight, let the left arm slide out at a 45° angle, to act as a stabilizer as you descend to the supine (on your back) position.
  8. Your left leg should now be straight, the right leg bent with the knee facing up.
  9. In the supine position, rotate the right holding arm palm inwards and grasp it with the left hand while holding the kettlebell.
  10. Simultaneously rotate to the right while lowering the kettlebell down under control and bringing both knees into the starting foetal position.

THE KETTLEBELL WINDMILL

This is a fantastic kettlebell exercise for developing exceptional flexibility and strength in the hips, back, waist and especially the oblique area.

In fact the kettlebell windmill is so efficient in building lean muscle around the midrift, that it requires you to only perform very low reps to avoid overly thick muscles !

IMPORTANT NOTE :

Before attempting this exercise, it is advisable to learn the basic movement pattern below without a weight. Or by using a very light weight. Possibly with a dumbell.

Descending Phase

  1. Lift the kettlebell with the Right Hand
  2. Perform a military press so the kettlebell is extended above your head, with the lifting right arm straight and touching your right ear.Let the kettlebell fall back and your body lean slightly forward.
  3. Your feet should be shoulder width apart, and also pointing forward.
  4. Turn both your feet at about 45° to your left simultaneously and parallel to each other, and your back foot directly under your hips.
  5. Take a deep breath in through your nose into your stomach, engage your core tightly, and look up to the kettlebell. Your Left hand palm resting inside your left thigh.
  6. From there, push your backside out and begin to bend your knees  (your rear leg slightly straighter than your front leg).
  7. Breath out through your teeth slowly and controlled,  to increase and sustain the intra abdominal pressure of the core.
  8. As you descend, keep your eyes on the kettlebell and allow it to rotate backwards to eliminate any sideway or forward movement of the kettlebell.
  9. The holding arm must be held at 90° throughout.
  10. Your left hand should now begin to slide down the inside of your left thigh towards your shinbone, for extra stability and to gauge depth of movement.
  11. Descend to a level which is challenging, but that is well within your physical capabilities .
  12. Remember to keep your head looking up towards the kettlebell, and to push your chest out to keep the back neutral (straight). 
  13. Keep the hip pushed backwards at all times.
  14. Ideally, and with practice. The torso should finish up in a 180° (horizontal)  position.


Ascending Phase

  1. Continue to Keep your feet at 45° throughout the exercise.
  2. From the bottom position, and after exhaling slowly on the descent.
  3. Take a deep breath in through your nose into your stomach and aggressively engage your core.
  4. Still keeping the kettlebell holding arm straight and at 90° throughout the exercise.
  5. Proceed to ascend while squeezing your right glute hard, and placing more emphasis on activating the Lat and oblique muscles (muscles at the side of your torso), to reinforce muscular tensile strength in the push up phase.
  6. Continue to allow the kettlebell to rotate backwards as you return to the start position.